Home > Childrens > Clay crafts

Teach you step by step how to make an ultra-light clay Little Red Riding Hood doll

The story of Little Red Riding Hood and Grandma Wolf can be said to be a household name, and the image of Little Red Riding Hood is also deeply rooted in the hearts of the people. It is perfect to use ultra-light clay to make a Little Red Riding Hood doll, because ultra-light clay can present this cartoon-like doll very well. It is actually quite difficult to make character dolls with ultra-light clay, so if you don’t have a solid foundation in making ultra-light clay, it’s best not to try it easily. Moreover, the face of the character made of ultra-light clay also needs to be painted with acrylic paint. Therefore, it is best for us to have a certain foundation in painting.

Step 1:

Teach you step by step how to make an ultra-light clay Little Red Riding Hood doll

Looking at the made ultra-light clay Little Red Riding Hood doll, isn’t it exciting?

Step 2:

Teach you step by step how to make an ultra-light clay Little Red Riding Hood doll

Draw a good draft first

Step 3:

Teach you step by step how to make an ultra-light clay Little Red Riding Hood doll

Pinch the ultra-light clay head

No. 4 Steps:

Teach you step by step how to make an ultra-light clay Little Red Riding Hood doll< /p>

Now let’s start drawing the facial features

Step 5:

Teach you step by step how to make an ultra-light clay Little Red Riding Hood doll

Start using a pencil to draw the outline of the eyes and mouth

Step 6:

Teach you step by step how to make an ultra-light clay Little Red Riding Hood doll

Start coloring

Step 7:

Teach you step by step how to make an ultra-light clay Little Red Riding Hood doll

This kind Coloring needs to be done layer by layer

Step 8:

Teach you step by step how to make an ultra-light clay Little Red Riding Hood doll

Add a darker color to the upper part of the eyes

Step 9:

Teach you step by step how to make an ultra-light clay Little Red Riding Hood doll

Add a dark blue outline to the edge

Step 10:

Teach you step by step how to make an ultra-light clay Little Red Riding Hood doll

Continue to use dark blue to create the effect

Step 11:

Teach you step by step how to make an ultra-light clay Little Red Riding Hood doll

The production of the eyes is still It takes some effort

Step 12:

Teach you step by step how to make an ultra-light clay Little Red Riding Hood doll

Start with white for the highlighted part

Step 13:

Teach you step by step how to make an ultra-light clay Little Red Riding Hood doll

Draw the eyelashes

Step 14:

Teach you step by step how to make an ultra-light clay Little Red Riding Hood doll

Then the mouth and blush are relatively simple

Step 15:

Teach you step by step how to make an ultra-light clay Little Red Riding Hood doll

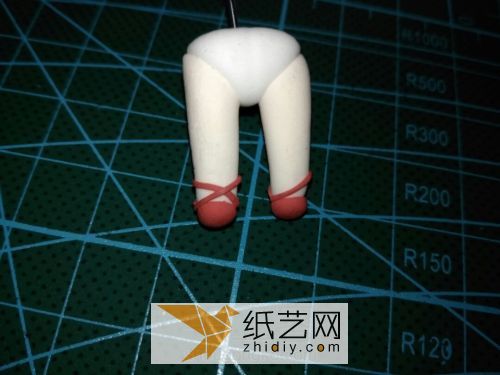
Making the leg part

Step 16:

Teach you step by step how to make an ultra-light clay Little Red Riding Hood doll

Check whether the proportions are appropriate

Step 17 :

Teach you step by step how to make an ultra-light clay Little Red Riding Hood doll

Make small shoes with clay

Step 18:

Teach you step by step how to make an ultra-light clay Little Red Riding Hood doll

Use fine clay to make shoe straps

Step 19:

Teach you step by step how to make an ultra-light clay Little Red Riding Hood doll

The legs are ready

Step 20:

Teach you step by step how to make an ultra-light clay Little Red Riding Hood doll

Use a thin piece of white clay to make a small skirt

Step 21:

Teach you step by step how to make an ultra-light clay Little Red Riding Hood doll

A little skirt is added on top

Step 22:

Teach you step by step how to make an ultra-light clay Little Red Riding Hood doll

Roll the red clay into thin sheets and cut it into this arc shape

Step 23:

Teach you step by step how to make an ultra-light clay Little Red Riding Hood doll

Add it to the skirt

Step 24:

Teach you step by step how to make an ultra-light clay Little Red Riding Hood doll

This is the skirt part

Step 25:

Teach you step by step how to make an ultra-light clay Little Red Riding Hood doll

Use a piece of red clay to make the waist

Step 26:< /p>

Teach you step by step how to make an ultra-light clay Little Red Riding Hood doll

Look at it from the side

Step 27:

Teach you step by step how to make an ultra-light clay Little Red Riding Hood doll

Use a piece of red clay to make the upper body

Step 28:

Teach you step by step how to make an ultra-light clay Little Red Riding Hood doll

Here you need to make wrinkles at the bottom Feel

Step 29:

Teach you step by step how to make an ultra-light clay Little Red Riding Hood doll

Let’s press the white clay into place

Step 30:

Teach you step by step how to make an ultra-light clay Little Red Riding Hood doll

Be patient

Step 31:

Teach you step by step how to make an ultra-light clay Little Red Riding Hood doll

The front of the clothes is enough

Step 32:
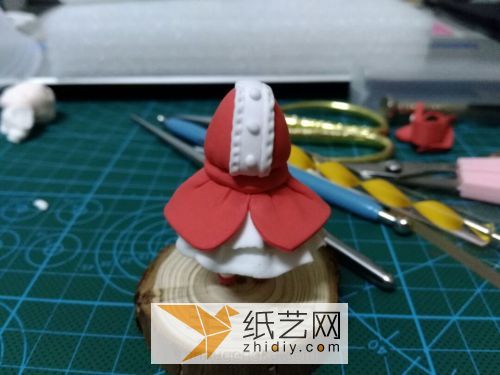
Teach you step by step how to make an ultra-light clay Little Red Riding Hood doll

The upper body can be added

Step 33:

< img alt="Teach you step by step how to make an ultra-light clay Little Red Riding Hood doll" src="https://img.111diy.com/timthumb.php?src=/d/file/20220222/ste2nx55yd0.jpg" />

Make the neck< /p>

Step 34:

Teach you step by step how to make an ultra-light clay Little Red Riding Hood doll

Make sleeves

Step 35:

Teach you step by step how to make an ultra-light clay Little Red Riding Hood doll

The feeling of puff sleeves needs to be made

Step 36 :

Teach you step by step how to make an ultra-light clay Little Red Riding Hood doll

Add sleeves

Step 37:

Teach you step by step how to make an ultra-light clay Little Red Riding Hood doll

Use a little clay to make a small lace

Step 38:

Teach you step by step how to make an ultra-light clay Little Red Riding Hood doll

Let’s make the arm part< /p>

Step 39:

Teach you step by step how to make an ultra-light clay Little Red Riding Hood doll

Use a little clay to make lace on the sleeves

Step 40:

Teach you step by step how to make an ultra-light clay Little Red Riding Hood doll

The sleeves are made

Step 41 :

Teach you step by step how to make an ultra-light clay Little Red Riding Hood doll

Let’s make a small basket of ultra-light clay

Step 42:

Teach you step by step how to make an ultra-light clay Little Red Riding Hood doll

This is what it looks like from the side

Step 43:

< p>Teach you step by step how to make an ultra-light clay Little Red Riding Hood doll

Give Little Red Riding Hood adds the basket

Step 44:

Teach you step by step how to make an ultra-light clay Little Red Riding Hood doll

Use red clay to make a bow and add it to the basket

Step 45:

Teach you step by step how to make an ultra-light clay Little Red Riding Hood doll

to make Little Red Riding Hoods hands

< p>Step 46:

Teach you step by step how to make an ultra-light clay Little Red Riding Hood doll

Add the handle

Step 47:

Teach you step by step how to make an ultra-light clay Little Red Riding Hood doll

Use red clay to make a cloak

Step 48:

p>

Teach you step by step how to make an ultra-light clay Little Red Riding Hood doll

< p>Just add it to the shoulders

Step 49:

Teach you step by step how to make an ultra-light clay Little Red Riding Hood doll

You can add a clay bow on the back

Step 50:

Teach you step by step how to make an ultra-light clay Little Red Riding Hood doll

Come and give Make the lace on Little Red Riding Hoods cloak

Step 51:

Teach you step by step how to make an ultra-light clay Little Red Riding Hood doll

A little bit of embossing

Step 52:

Teach you step by step how to make an ultra-light clay Little Red Riding Hood doll

The cloak is now decorated

Step 53:

Teach you step by step how to make an ultra-light clay Little Red Riding Hood doll

Roughly make the head like this

Step 54:

Teach you step by step how to make an ultra-light clay Little Red Riding Hood doll

After adding the head to the body, start attaching the hair

Step 55:

p>

Teach you step by step how to make an ultra-light clay Little Red Riding Hood doll

< p>The bangs in the front are ready

Step 56:

Teach you step by step how to make an ultra-light clay Little Red Riding Hood doll

You don’t need to deal with it later because you have to wear a hat

Step 57:

< p>Teach you step by step how to make an ultra-light clay Little Red Riding Hood doll

Use Knead a piece of red clay into the shape of a hat

Step 58:

Teach you step by step how to make an ultra-light clay Little Red Riding Hood doll

This hat has a pointed tip

Step 59:

Teach you step by step how to make an ultra-light clay Little Red Riding Hood doll

Then attach the hat That’s it

Step 60:

Teach you step by step how to make an ultra-light clay Little Red Riding Hood doll

This will be very beautiful

Step 61:

Teach you step by step how to make an ultra-light clay Little Red Riding Hood doll

Add a small bow made of clay at the neck

Step 62:

Teach you step by step how to make an ultra-light clay Little Red Riding Hood doll

Isn’t it a beautiful Little Red Riding Hood made of clay?

Step 63:

Teach you step by step how to make an ultra-light clay Little Red Riding Hood doll

Look at another picture

Step 64:

Teach you step by step how to make an ultra-light clay Little Red Riding Hood doll

The making of this Little Red Riding Hood really tests your clay making skills.

Step 65:

Teach you step by step how to make an ultra-light clay Little Red Riding Hood doll

When making this Little Red Riding Hood doll, you still need to highlight the little red riding hood she is wearing and the red clothes she is wearing, so that everyone can tell at a glance that you are making the character Little Red Riding Hood. image. Before making, it is best to alsoIt is to draw a proportional sketch on the paper, so that you don't need to worry too much about the body proportions when making it, as long as you compare it with the sketch after making it.