Home > Handicrafts of life > Small craftsmanship

Detailed tutorial on triangle insertion of 3D globe and peacock

Detailed tutorial on triangle insertion of 3D globe and peacock Detailed tutorial on triangle insertion of 3D globe and peacock

Friday, cloudy day, slight breeze, not cold,

I heard from my senior yesterday that tonight she has a date with the boy in sportswear from the company next door,

We discussed it all afternoon and planned to make an appointment to have Japanese food for lunch at work today.

I don’t know what senior will be wearing today!


Hee hee, look at the excitement, exit the subway, and run to the company happily!


This is Paper Art Network, and we love life together.

---------------------------------------

In the past few days, many friends want tutorials on triangle penetration.

So today we share two 3D triangle penetration tutorials.


Preparation before the tutorial: Tutorial on folding the triangular plug unit module,

You can search for the keyword: triangular plug on the official website of Paper Art. .

There are many tutorials on unit modules and tutorials on triangle insertion works.


Tutorial 1: 3D triangle insertion of peacock

Detailed tutorial on triangle insertion of 3D globe and peacock

5 kinds of colored paper should be prepared. Roughly about 2600 unit modules!

Blue: 854, purple 572, orange 480, yellow 451, green 216.

If you don’t want to make it so big, you can reduce it in proportion.

Do the body part first.

Detailed tutorial on triangle insertion of 3D globe and peacock

Detailed tutorial on triangle insertion of 3D globe and peacock

Do the neck part. There are certain rules for inserting the triangle plug,

Single If you don’t understand the picture, you can flip through a few pictures for reference.

Detailed tutorial on triangle insertion of 3D globe and peacock

Make wings and feathers behind you!

Detailed tutorial on triangle insertion of 3D globe and peacock

Detailed tutorial on triangle insertion of 3D globe and peacock

Detailed tutorial on triangle insertion of 3D globe and peacock

Detailed tutorial on triangle insertion of 3D globe and peacock

Detailed tutorial on triangle insertion of 3D globe and peacock

Detailed tutorial on triangle insertion of 3D globe and peacock

Detailed tutorial on triangle insertion of 3D globe and peacock

Detailed tutorial on triangle insertion of 3D globe and peacock

Detailed tutorial on triangle insertion of 3D globe and peacock

Detailed tutorial on triangle insertion of 3D globe and peacock

Make a crown

Detailed tutorial on triangle insertion of 3D globe and peacock

Detailed tutorial on triangle insertion of 3D globe and peacock

Detailed tutorial on triangle insertion of 3D globe and peacock


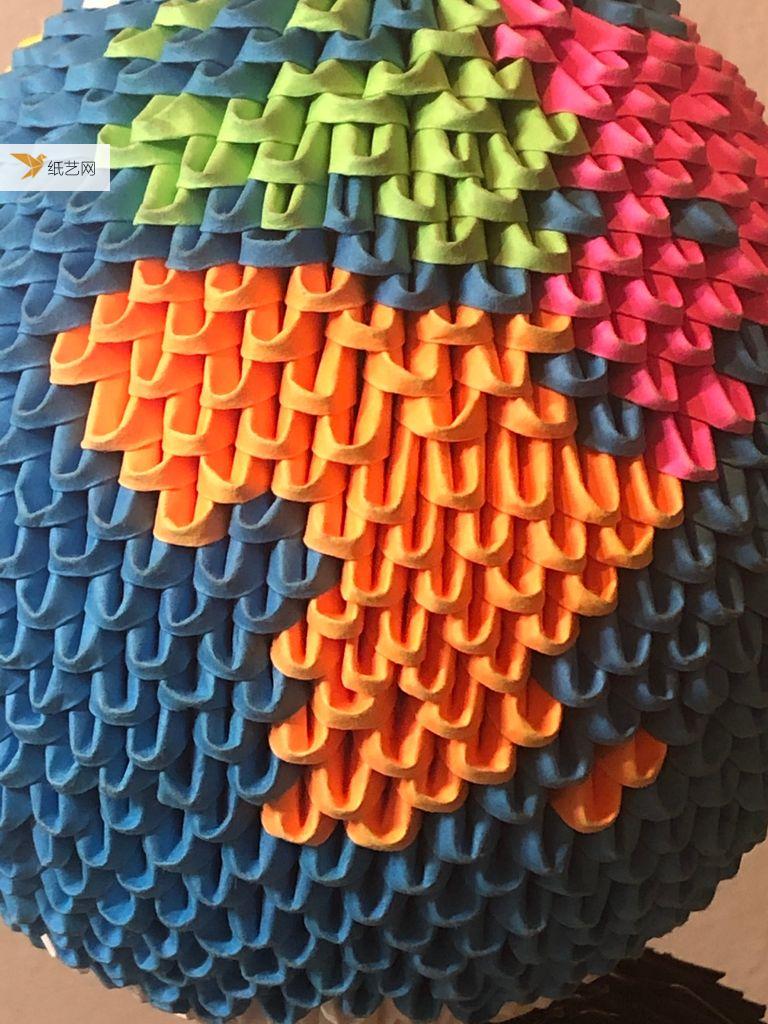
Tutorial 2: 3D triangular globe

Detailed tutorial on triangle insertion of 3D globe and peacock

Just use colored paper as big as A4 paper , cut according to the picture below,

You can also directly purchase the special triangle insert paper cut by machine online.

Detailed tutorial on triangle insertion of 3D globe and peacock

If you prepare it yourself If so, the list is here,

2 yellow (North America), 2 purple (South America), 2 orange (Africa), 1 green (Europe), 4 pink (Asia), red ( Australia) 1 piece, white (Antarctica) 3 pieces, blue (ocean) 28 pieces, black (base and stand) 6 pieces.

Other tools: Glue, because the work is large, you can consider using glue to fix it.

Cut the A4 paper into an 8*4 grid with each strip 3.5 cm wide. After cutting, it will be a 3.5*5 cm piece of paper.

Detailed tutorial on triangle insertion of 3D globe and peacock

Collapse the numbers of each color respectively:

45 yellow, 40 purple, 55 orange, 15 green, 100 pink, 20 red, 90 white, 880 blue, and 170 black.

Detailed tutorial on triangle insertion of 3D globe and peacock

Open below Assembled. I flipped through several pictures that I couldn’t understand.

Detailed tutorial on triangle insertion of 3D globe and peacock

Detailed tutorial on triangle insertion of 3D globe and peacock

Detailed tutorial on triangle insertion of 3D globe and peacock

Detailed tutorial on triangle insertion of 3D globe and peacock< /p>

Detailed tutorial on triangle insertion of 3D globe and peacock

Detailed tutorial on triangle insertion of 3D globe and peacock

Detailed tutorial on triangle insertion of 3D globe and peacock

Detailed tutorial on triangle insertion of 3D globe and peacock

Detailed tutorial on triangle insertion of 3D globe and peacock

Detailed tutorial on triangle insertion of 3D globe and peacock

Detailed tutorial on triangle insertion of 3D globe and peacock

Detailed tutorial on triangle insertion of 3D globe and peacock

Detailed tutorial on triangle insertion of 3D globe and peacock

Detailed tutorial on triangle insertion of 3D globe and peacock

Detailed tutorial on triangle insertion of 3D globe and peacock

Detailed tutorial on triangle insertion of 3D globe and peacock

Detailed tutorial on triangle insertion of 3D globe and peacock

Detailed tutorial on triangle insertion of 3D globe and peacock

Detailed tutorial on triangle insertion of 3D globe and peacock

< img alt="Detailed tutorial on triangular 3D globe and peacock" src="https://img.111diy.com/timthumb.php?src=/d/file/20220216/rutjfm1x3gu.jpg" style="width: 600px; height: 800px;" title= "38.jpg" width="600" height="800" border="0" hspace="0" vspace="0"/>

Detailed tutorial on triangle insertion of 3D globe and peacock

Detailed tutorial on triangle insertion of 3D globe and peacock

Detailed tutorial on triangle insertion of 3D globe and peacock

Detailed tutorial on triangle insertion of 3D globe and peacock

Detailed tutorial on triangle insertion of 3D globe and peacock< /p>

Detailed tutorial on triangle insertion of 3D globe and peacock

Detailed tutorial on triangle insertion of 3D globe and peacock

Detailed tutorial on triangle insertion of 3D globe and peacock

What kind of handmade tutorials do you want? Leave a message to Xiaoyi now!