Author: Tianyi Workshop Deep Blue https://s.click.taobao.com/wUWmlKw uses the moldable characteristics of vegetable tanned leather to create a more stylish armor for headphones. The entire casing completely wraps the earphones, and the gourd-shaped buckle leather pieces are connected by suction cup buckles. When opening, the upper cover of the charging base is opened at the same time, and a charging jack design is reserved at the bottom, making the overall use convenient and concise. Main materials: 1mm vegetable tanned leather about 20x20cm, 1 16mm suction cup buckle, 1 hook buckle Required tools: a set of two-in-one plastic molds, a set of matching acrylic templates, a set of basic leather tools, a set of edge banding tools , 4 pieces of 2-inch g clip production steps:

Cut four pieces of 1mm vegetable tanned leather into square leather pieces of about 10x9cm, soak them in water and set aside

Insert it into the 1-out-2 molding mold of Tianyi Workshop. Note that the upper and lower parts are back-to-back. In this way, no matter whether the plastic protective case is opened or closed, all you can see is the leather surface. First press down a certain distance with your hands to adjust the four corners of the mold

Use four 2-inch g clips to fix them on the four sides, and slowly press down until they are flat

Use the outer frame cutting template to mark the cutting line of the outer frame and make the cutting holes,

Use the arched dividing template to mark out the upper and lower sides of the shaping piece pointSecant line and intermediate anchor point
 < /p>The effect after drawing is shown in the picture

Use the positioning template to mark the slotted position on the back of the protective case

The left and right sections each have a cutting line and a circle punch point

Align the front lower template with the dividing line, and mark the slot positioning at the suction cup buckle on the front of the protective case. Line, this template picture is in a testing state, and the actual product for sale is a version with grooves.

Front upper After the sheet template is aligned with the dividing line, punch the cutting holes

The effect after completing the above steps

Cut out the upper and lower pieces of the gourd-shaped buckle and the middle drum gasket

Separate the two pieces of plastic skin on the back of the case and prepare to glue them together
< img src="https://img.111diy.com/timthumb.php?src=/d/file/p/395f68efe4475ab58d4782ea6c3fadc3.jpg" alt="">
Brush both sides of the water-based white glue evenly and wait for it to dry

Separate the plastic skin from the front of the shell and take out the outer The slice has a good groove

Insert the suction cup buckle. It should be adjusted here to install the buckle seat on the shell body. Please pay attention to it

The front effect after installation

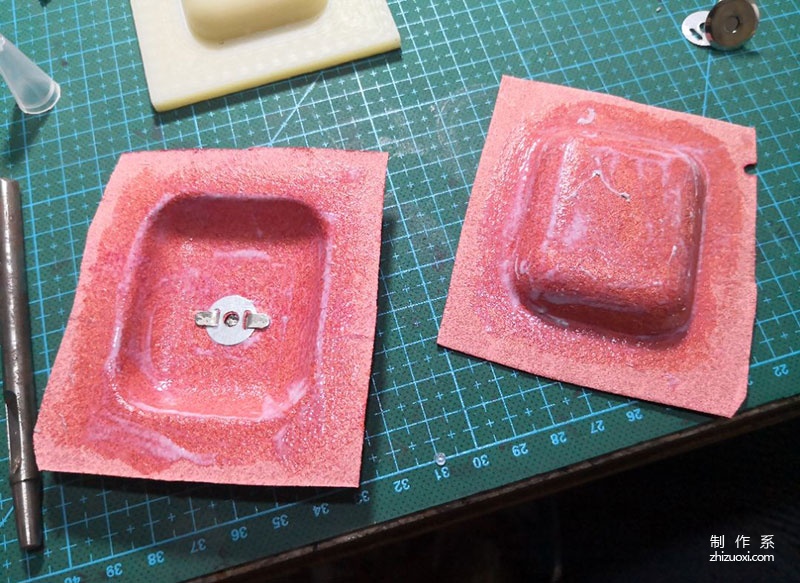
Brush glue on the front and back of the two pieces of the shell and let them dry
< img src="https://img.111diy.com/timthumb.php?src=/d/file/p/eba7494599be42b5ec566ba5334b0b59.jpg" alt="">
Set on the convex part of the plastic moldComplete the fit on the mold, and press each part with your hands to ensure complete fit

Place the rear part of the shell on the punch and use a paring knife to carefully cut the rear part of the shell

Use 1mm round punch to punch out a round hole

4mm diamond punch

Use a leather trimmer to cut off excess leather, and use a carving knife to cut out the excess leather. Charger jack

The effect after completing the above steps

Put the front part of the shell on the punch and cut it with a paring knife

Gourd-shaped buckle and chop

Install the suction cup buckle. The adjustment was mentioned earlier, so The buckle cover of the suction cup buckle should actually be installed here

Use bone rods to shape and create a bulging effect

After completing the above steps, for each component, before sewing, first cut the edges that do not require sewing, such as the place where the front of the shell is divided, and groove the back of the shell. place, and the place where the charger slot needs to be sealed first

Start sewing, first sew the gourd-shaped buckle to the upper front part of the shell

The fitting part of the shell must be polished first and then glued

After gluing, sew the lower part first, then the upper part

After the sutures are completed, the leather edges can be properly processed

Complete

Tips for installing airpods: The difficulty is actually to separate the slots at the front and rear of the shell. Use a leather knife to cut a long line first, and then Slowly cut the other parts along the dividing line. It is not necessary to cut the head completely at one time. After cutting to a certain depth, use a utility knife to cut it once and separate it completely.
Leather Shaping


 < /p>The effect after drawing is shown in the picture


