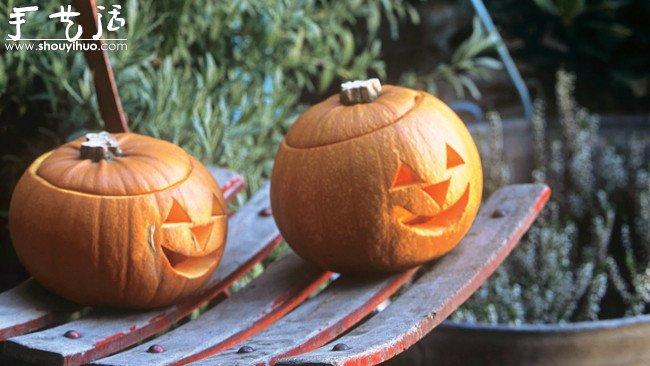
The following is a DIY handmade method for Halloween pumpkin lanterns. For specific DIY methods, please refer to the tutorial below.
The jack-o'-lantern is a classic symbol of Halloween. Legend has it that a man named Jack was so stingy that he could not enter heaven after death, and he could not enter hell because he made fun of the devil. In order to scare away these wandering spirits on Halloween, people carved scary faces out of pumpkins, beets or potatoes to represent Jack with a lantern. This is the origin of the jack-o'-lantern.

The DIY method of Halloween pumpkin lantern is very simple. First choose the pattern to be carved, and then pick up the knife and "get started" on the pumpkin. Finally, put a candle inside and it will be OK.

DIY Jack-O-Lantern Materials:
Knife
Spoon
Chalk
Candles
A large carving pumpkin
Specific steps for DIY pumpkin lanterns:
1. Use a knife to go around the opening at the top and dig out the lid with the pumpkin base. Make sure the cut is smooth so that the lid does not fall into the pumpkin. The opening should be large enough for you to reach through. Use a spoon to scoop out the inner pulp and make the cut surface as smooth as possible. Carefully remove the melon seeds and pulp. Select the area you want to carve and thin the piece of rind to about 1 inch thick. This step focuses on the bottom side of the pumpkin cavity. Usually there is mustard tissue here, which must be smoothed to facilitate the final placement of the candle inside. You can try placing the candle first to see if it can be placed without falling over.

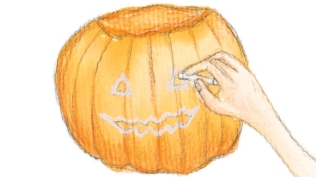
2. Use chalk to draw the eyes, nose and mouth you want to carve on the surface of the pumpkin. The classic jack-o'-lantern has a large, toothy smile, triangular eyes and nose. Of course, you can also search for some novel pumpkin lanterns online and copy their facial features.

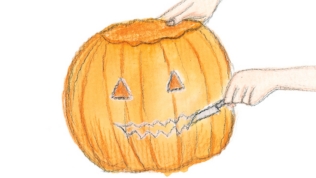
3. Use a knife to carefully pick out details of the pumpkin skin to mark, then cut out the mouth, being careful! Avoid cutting off any floating parts, such as the teeth or the eyeball in the center. Once you've finished carving, erase the chalk lines and pumpkin skin.

Notes on DIY pumpkin lanterns:
The melon used for making jack-o'-lanterns must be fresh, raw but not soft, and free of rot, mold, and damage.
The front of the pumpkin should be as smooth as possible to allow the carving to be imprinted onto it.
Use a saw or knife with a serrated blade to carve a corner into the pumpkin (point the knife toward the middle of the pumpkin) so the lid doesn't fall into the pumpkin.
For skewed pumpkins, digging a hole in the bottom of the pumpkin can easily fix the skewed pumpkin.
The design carved into the jack-o'-lantern can be simple or fancy, but it may be easier if you draw it on paper beforehand.
The best way to light a jack-o-lantern is to use a candle. The light of a candle is warm and its naturally flickering flame can give people a nostalgic feel.
Rub some Vaseline on the cut edges to prevent them from drying out. When using candles, dig a small hole in the top of the pumpkin to act as a chimney for heat dissipation.
When not in use, it should be placed in a plastic bag and stored in the refrigerator. To restore a shrunken pumpkin to its original shape, simply soak it in a basin of cold water overnight.


