Home > Origami > Origami basics

Western dragon with wings origami tutorial illustration

Western dragon with wings origami tutorial illustration Western dragon with wings origami tutorial illustration

Western dragon with wings origami tutorial illustration

Western dragons and Eastern dragons are completely different. Western dragons have wings. Just find some paper, but the paper must be thinner.

Western dragon with wings origami tutorial illustration

Of course larger paper would be better, but do not use copy paper.

Western dragon with wings origami tutorial illustration

Fold along the diagonal crease. There is a crease connecting two points. After crossing the intersection point, fold the three-section line and fold the other Three equal lines.

Western dragon with wings origami tutorial illustration

Fold the four six-section lines and aggregate the four six-section lines as shown in the illustration.

Western dragon with wings origami tutorial illustration

Start processing the head, and fold the bisecting lines of the two corners one time.

Western dragon with wings origami tutorial illustration

Fold the petals and start working on the dragons tail, turn this side over and bring it together.

Western dragon with wings origami tutorial illustration

Fold the front and back petals, then pull them apart and flatten them as shown in the illustration.

Western dragon with wings origami tutorial illustration


Western dragon with wings origami tutorial illustration


Western dragon with wings origami tutorial illustration


Western dragon with wings origami tutorial illustration


Western dragon with wings origami tutorial illustration


Western dragon with wings origami tutorial illustration


Western dragon with wings origami tutorial illustration

Western dragon with wings origami tutorial illustration


Western dragon with wings origami tutorial illustration

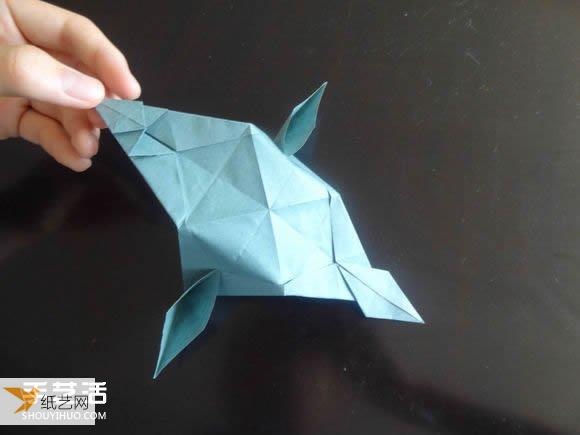
?????????????????????Fold about one-third of the way, then turn it over and fold the petals as far as possible

Western dragon with wings origami tutorial illustration

Western dragon with wings origami tutorial illustration

Western dragon with wings origami tutorial illustration


Western dragon with wings origami tutorial illustration

Western dragon with wings origami tutorial illustration


Western dragon with wings origami tutorial illustration

Western dragon with wings origami tutorial illustration

< p>

Western dragon with wings origami tutorial illustration


Western dragon with wings origami tutorial illustration


Western dragon with wings origami tutorial illustration


Western dragon with wings origami tutorial illustration

Western dragon with wings origami tutorial illustration


Western dragon with wings origami tutorial illustration


Western dragon with wings origami tutorial illustration

Western dragon with wings origami tutorial illustration


Western dragon with wings origami tutorial illustration


Western dragon with wings origami tutorial illustration

Fold it downwards and fold back the paper that extends beyond the original edge.

Western dragon with wings origami tutorial illustration


Western dragon with wings origami tutorial illustration


Western dragon with wings origami tutorial illustration


Western dragon with wings origami tutorial illustration

< p>

Western dragon with wings origami tutorial illustration


Western dragon with wings origami tutorial illustration


Western dragon with wings origami tutorial illustration

Western dragon with wings origami tutorial illustration


Western dragon with wings origami tutorial illustration


Western dragon with wings origami tutorial illustration

Western dragon with wings origami tutorial illustration

At this time, you need to start processing and folding the tail Make a crease along the bisector of the corner, and close and fold along the crease in the previous step.