Home > Origami > Origami basics

Illustration of the easy-to-learn method of folding roses

Illustration of the easy-to-learn method of folding roses Illustration of the easy-to-learn method of folding roses

Illustration of the easy-to-learn method of folding roses

What I share with you here is a very beautiful paper rose tutorial. Although it is a finished product, it looks a bit like a mushroom.

Illustration of the easy-to-learn method of folding roses

Illustration of the easy-to-learn method of folding roses

Illustration of the easy-to-learn method of folding roses

Illustration of the easy-to-learn method of folding roses

Illustration of the easy-to-learn method of folding roses

Illustration of the easy-to-learn method of folding roses

Illustration of the easy-to-learn method of folding roses

Illustration of the easy-to-learn method of folding roses

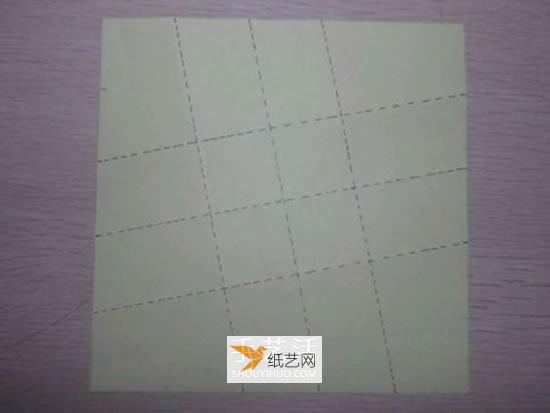
Draw four strips, each of which is divided into four equal parts, the middle one Make mountain folds on the right and bottom sides of the four grids. The right side and bottom side of the middle grid overlap. The other three sides are the same. All four sides are completed according to the diagram.

Illustration of the easy-to-learn method of folding roses

Illustration of the easy-to-learn method of folding roses

Illustration of the easy-to-learn method of folding roses

Roll it up and then unfold it, then fold the line under the middle grid, and fold some small grids on the right side of the middle grid. At an angle of 45 degrees.

Illustration of the easy-to-learn method of folding roses


Illustration of the easy-to-learn method of folding roses


Illustration of the easy-to-learn method of folding roses


Illustration of the easy-to-learn method of folding roses


Illustration of the easy-to-learn method of folding roses


Illustration of the easy-to-learn method of folding roses< /p>


Illustration of the easy-to-learn method of folding roses

It will form a red color after expansionThe color creases and the fold lines in the folding diagram are very good after folding. The four sides are completed according to the diagram and then gathered together.

Illustration of the easy-to-learn method of folding roses


Illustration of the easy-to-learn method of folding roses


Illustration of the easy-to-learn method of folding roses


Illustration of the easy-to-learn method of folding roses


Illustration of the easy-to-learn method of folding roses< /p>

People who have folded roll cores should know that even if they have not folded them, they should be able to understand them by looking at the illustrations.

Illustration of the easy-to-learn method of folding roses


Illustration of the easy-to-learn method of folding roses


Illustration of the easy-to-learn method of folding roses

Illustration of the easy-to-learn method of folding roses


Illustration of the easy-to-learn method of folding roses


Illustration of the easy-to-learn method of folding roses


Illustration of the easy-to-learn method of folding roses


Illustration of the easy-to-learn method of folding roses


Illustration of the easy-to-learn method of folding roses


Illustration of the easy-to-learn method of folding roses

Illustration of the easy-to-learn method of folding roses

Illustration of the easy-to-learn method of folding roses


Illustration of the easy-to-learn method of folding roses

Use tweezers to hold the middle and roll it up. The front is made like this, and the sides are also folded according to the diagram. As for the You can freely perform the plastic surgery. When I first folded it, I explored various folding methods before finally folding it out. I was also very serious when folding it for the second time.