Origami flower making tutorial, there are simple There are complicated and simple origami flower making tutorials, which are relatively simple to make. The complicated handmade origami flower making tutorials are more complicated to make. Many students prefer simple origami flower making tutorials. This is because of the simple handmade origami flower making tutorials. The tutorial can be completed quickly without spending too much time, so the tutorial for making handmade origami flowers recommended to everyone is a simple tutorial for making origami flowers. We can even say that it is a very simple tutorial for making handmade origami flowers. From the production, we can see that it is not folded with one piece of paper, but through different papers. After the unit modules are folded, they are then combined together to complete the production of an origami flower. This hand-made origami flower is then carried out. When making, it is relatively easy to choose materials. You don’t need to choose those very complicated papers. You only need to choose simple sticky notes to fold and make.
The process of making this handmade origami flower is very simple, but there are still many application scenarios. For example, we can hang this handmade origami flower as a very beautiful holiday decoration. We can also use this handmade origami flower as a very beautiful holiday decoration. Pasting origami flowers on handmade greeting cards is also an embellishment for handmade greeting cards. Of course, if you want to paste them on handmade greeting cards, it is best to make a smaller handmade origami flower, so that the effect of pasting will be better. At the same time, we can choose different colors of note paper to make this handmade origami flower a colorful style.
Step 1:

Prepare 2 large pieces of colored paper and cut them into 8 pieces. But you can choose whatever size you like
Step 2:

Fold both sides crosswise
Step 3:

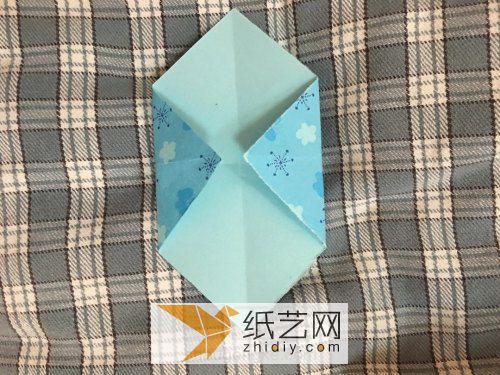
Fold both sides of the triangle along the middle line and align them equally
Step 4:

As shown in the picture
Step 5:

Fold again to align the middle line
Step 6:

Turn it over and it looks flat
Step 7:

Fold in half along the back
Step 8:

As shown in the picture, use a little force to deepen the mark.
Step 9:

Open
Step 10:

Connect with double-sided tape
Step 11:
Every fold is the same and glued together as shown


![[Origami Encyclopedia] Creative handmade origami video tutorial on origami Apple LOGO](https://img.111diy.com/timthumb.php?src=/d/file/20220217/dd2zin3tlq5.jpg&w=200&h=200&zc=1)

![[Complete Fish Origami] Carp Origami Illustrated Tutorial](https://img.111diy.com/timthumb.php?src=/d/file/20220217/crxjaul5f53.jpg&w=200&h=200&zc=1)


