One ??of the most commonly used small items in our daily life is the wallet, because we need to put ID cards, bank cards, credit cards, or some cash in the wallet, so the wallet can be said to be close to the body. We can use origami to The way to get a wallet is also very practical. The most important thing is that by using origami to make a wallet, we can get a very strong sense of manual accomplishment. This is why more and more students will There is an important reason why origami is used to realize necessities in daily life.
Step 1:

Finished picture of origami wallet
Step 2:

Open it and take a look, there are several Layers
Step 3:

This is usually dyed paper
Step 4:

Fold one of the sheets in half
Step 5:

Then open
Step 6:
Fold up and down to Middle
Step 7:

Fold left and right in half
Step 8:

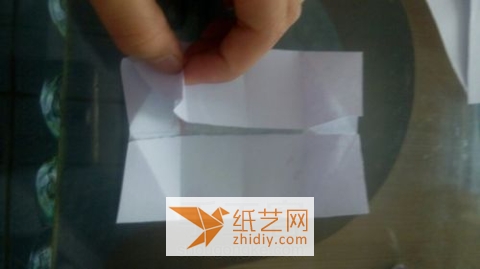
Then fold the sides to the middle
Step 9:

The corners on both sides should be folded like this
Step 10:

Open the front corner
Step 11:< /p>

Open one more step
Step 12:

Fold this edge inwards
Step 13:
< img alt="Tutorial on making a multi-layered origami wallet" src="https://img.111diy.com/timthumb.php?src=/d/file/20220222/x12xnn0ejfo.jpg" />
Both sides To fold like this
Step 14:

This is what it will look like after folding
Step 15:

Let’s continue
Chapter Step 16:

Watch how the gesture works
Step 17:

Fold this edge
Step 18:
p>
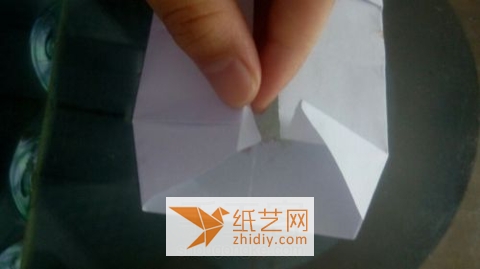
It looks a bit messy here
Step 19:

Press and fold it
Step 20:

Thats it< /p>
Step 21:

Just fold the four corners like this
Step 22:

Fold it like this
Step 23 :

Fold it in half again
Step 24:

You can fold a few more and stick them together to create a wallet.We see here that the method of making an origami wallet is not Its not difficult, but why is the illustrated origami tutorial so complicated? Mainly because in order to help origami beginners better fold a beautiful origami wallet, this illustrated tutorial is relatively complicated, that is to say, it is unfolded as much as possible Many detailed steps are given to you so that you can complete it more easily when making origami wallets. At the same time, if you use harder paper or larger paper, such an illustrated tutorial for origami wallets is actually itself How to make an origami accordion bag, which means we can put our files into an origami accordion bag and still have better results.


![[Origami Encyclopedia] Creative handmade origami video tutorial on origami Apple LOGO](https://img.111diy.com/timthumb.php?src=/d/file/20220217/dd2zin3tlq5.jpg&w=200&h=200&zc=1)

![[Complete Fish Origami] Carp Origami Illustrated Tutorial](https://img.111diy.com/timthumb.php?src=/d/file/20220217/crxjaul5f53.jpg&w=200&h=200&zc=1)


