Everyone is very familiar with Pikachu, so where is Pikachu usually installed? Of course, it is installed in a Poké Ball. The hand-made origami tutorial taught here is a tutorial on making origami Poké Balls. Compared with traditional origami and making flower balls, this origami elf ball is not that easy. Origami flower balls are usually made by splicing, that is, we first make paper units, and then I combine different ones. The origami units are combined together in a certain way to get an origami flower ball. But here you can see that the origami elf ball is more complicated and is completely made from one piece of paper.
In order to reduce the difficulty of learning this origami elf ball, the handmade origami elf ball shown here is made by combining two pieces of paper. , we can see that because two pieces of paper are used to complete the production of this origami elf ball, the two colors of the origami elf ball can be presented separately, making the final production effect look more like a real elf ball .
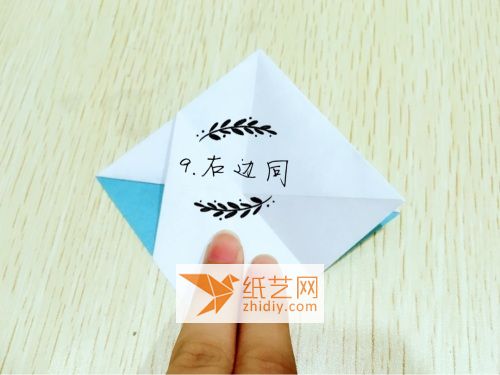
Since the production of this handmade origami elf ball is relatively complicated, you can see that this origami elf ball illustrated step-by-step tutorial is relatively long, but it doesn’t matter, this handmade elf ball The tutorial for making an origami Poké Ball is very clear, precisely because it has many steps, so even if you are a beginner in manual origami, you can easily complete the folding and making of this hand-made origami Poké Ball. As a truly qualified handmade origami enthusiast, you must learn how to fold this handmade origami elf ball. Only in this way can you tell others that you are a successful handmade origami person.
Step 1:

Step 2:

< br/>
Step 3:

Step 4:

Step 5:

< br/>
Step 6:

Step 7:

Step 9:

Step 10:
p>
Step 11:

Step 12:

Step 13:

Step 14:

Step 15:

Step 16:

Step 17:

Step 18:

Step 19:

Step 20:

Step 21:

Step 22:< /p>

Step 23:

Step 24:

Step 25:

Step 26:

Step 27:

Step 28:

Step 29:

Step 30:
< p>
Step 31:

Step 32:

Step 33:

Step 34:

Step 35:
 < /p>
< /p>
Step 36:

Step 37:

Step 38:

Step 39 :

Step 40:

Step 41:

< br/>
Step 42:

Step 43:

Step 45:

Step 46:

Step 47:

Step 48:

Step 49:

Step 50:< /p>

Step 51:

Step 52:

Step 53:


![[Origami Encyclopedia] Creative handmade origami video tutorial on origami Apple LOGO](https://img.111diy.com/timthumb.php?src=/d/file/20220217/dd2zin3tlq5.jpg&w=200&h=200&zc=1)

![[Complete Fish Origami] Carp Origami Illustrated Tutorial](https://img.111diy.com/timthumb.php?src=/d/file/20220217/crxjaul5f53.jpg&w=200&h=200&zc=1)


