Convertibles refer to cars with a foldable and openable roof, which are divided into hard-top cars and soft-top cars. Many car fans are pursuing convertibles because men like freedom and women like romance, and convertibles satisfy everyones common wishes.

Illustrated tutorial for handmade origami convertible. Look at the completed work in the picture above. It is quite realistic and cute!~

Use 40cm two-color square paper.

With the car body color facing up, first fold a diagonal line.

Fold in half to the right.

Connect the left vertex and right bottom point on a diagonal.

Open and fold to the right along the intersection point.

Open it and fold the right side in half towards the crease to complete the three equal parts.

Open it and fold both sides in half towards the crease to complete six equal parts.

Continue to fold in half to complete 12 equal lengthwise sections.

Using the intersection of the diagonals as a reference, fold the top and bottom into two equal widths.

Open it and fold it into equal widths at the top and bottom.

Open the upper end and fold the lower end into two grids.

Align the top edge with the lower grid and fold it in half.

Open it and fold the top into three grids.

Align the lower edge with the upper two grids and fold it in half.

With the top edge unchanged, pull the bottom edge up to align the top edge and fold it in half.

Open.

Align the top edge with one grid at the bottom and fold it in half.

Align the lower edge with a grid at the upper end and fold it in half.

Open.

Fold the three grids on both sides in half.

Open, turn over. The mountain folds out diagonally everywhere.

Count the squares and continue the mountain fold.

Fold both sides of the center line in half.

Fold it in half.

Turn to the front.

Section break.

Tuck the paragraph behind the back.

The perspective shifts to the right vertex.

Push down the position in the picture along the existing crease and fold two diagonal lines.

The bottom is the same, with the valley line connecting the top.

Turn over to the back and look to the upper left corner.

Flat the middle edge to the right.

Press the top and bottom flat, and turn the corner of the paper to the left.

Back to the front.

Fold the edge of the paper to the left, open the top and flatten it.

The top and bottom are consistent.

Fold the paper layer folded to the left side toward the back.

Flat.

Fold the upper and lower paper layers to the left.

Repeat the steps on the right on the left.

The mountains on the left and right sides fold into a vertical state.

Pull apart the folded paper layer at the bottom, and open and flatten the left and right sides along the existing creases.

Go to the top and pull open the first layer.

Pull off the second layer.

The left and right sides are consistent.

Back to bottom.

Fold along the existing crease section and work on the paper layer.

The left and right sides are consistent, and the paper layer is pushed in to separate the front of the car.

Don’t let go of your hands and turn your back.

Fold a small triangle on the connection layer to lock it.

Back to the front.

Press down along the existing crease.

Process the paper layer.

Fold the two sections back.

Find this point on the left and right sides, press down, and push down the entire segment at the same time.

What it looks like after pushing them all down.

Bottom image.

Turn sideways and push the windshield down. Fold the sides inwards so that the edges are vertical.

Fold the corners of the folded sections.

The mountain in front is folded.

Turn to the inside and add a section fold at the bottom to shape the chair.

Front view.

Fold the inside edge into a triangle to lock it.

Inside view.

The headlights are pushed in as shown, and the front of the car is pulled forward.

The taillights of the car are pushed in and processed.

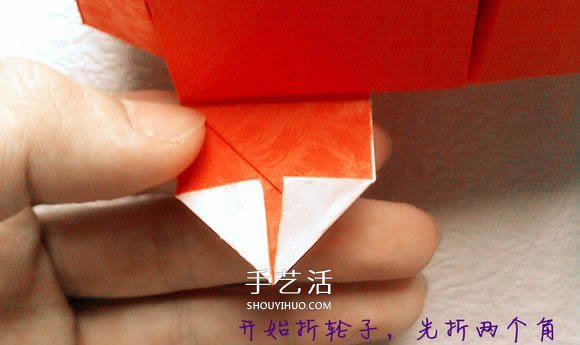
Start folding the wheel, first fold the two corners.

Fold the sharp corners in half.

The same goes for the bottom.

The convertible origami is completed, you can put the mini doll toys in it and play~


![[Origami Encyclopedia] Creative handmade origami video tutorial on origami Apple LOGO](https://img.111diy.com/timthumb.php?src=/d/file/20220217/dd2zin3tlq5.jpg&w=200&h=200&zc=1)

![[Complete Fish Origami] Carp Origami Illustrated Tutorial](https://img.111diy.com/timthumb.php?src=/d/file/20220217/crxjaul5f53.jpg&w=200&h=200&zc=1)


