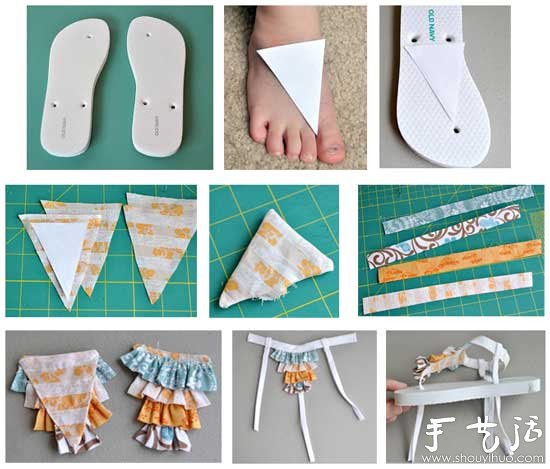
Cute sandals handmade tutorial, materials need to be prepared: soles (take materials from old sandals, or buy a new pair of soles at the shoe store), 1/2-inch wide elastic band, 1/2-inch wide webbing, and a few pieces of colorful fabrics . For specific DIY methods, please refer to the graphic tutorial below.
Sandals DIY Steps:
1) Prepare the soles, which require 3 threading holes at the bottom;
2) Cut 4 pieces of triangular fabric. The size depends on the size of your feet. The measurement method is as shown in the figure;

3) These 4 pieces of fabric are in groups of 2 pieces each, with the front sides overlapping each other, and stitched together in a circle with a seam allowance of 1/4 inch, leaving a back seam unsewed. After completion, there are 2 pieces of triangles, one for each of the left and right shoes;
4) Turn the triangular opening to the front and sew the opening;
5) Cut the fabric to make pleats. Cut 1 piece of fabric of each of the four colors, and divide each piece into 2 pieces for the left and right shoes;
6) Then sew on the triangular pieces of fabric in sequence according to the method of sewing a pleated skirt;
7) Sew the two ends of the elastic band together to form a ring shape. Fold the webbing in half and sew until it is 1/4 inch wide.
8) Sew the elastic band, webbing and the wrinkled fabric piece just sewn together;
9) Pass the webbing into the three holes of the sole, tie it with a knot, and cut off the excess cloth. This completes the hand-making of the sandals.


